
Fragments in Android using Orientations :
A
Fragment represents a behavior or a portion of user interface in anActivity. You can combine multiple fragments in a single activity to build a multi-pane UI and reuse a fragment in multiple activities. You can think of a fragment as a modular section of an activity, which has its own lifecycle, receives its own input events, and which you can add or remove while the activity is running (sort of like a "sub activity" that you can reuse in different activities).
A fragment must always be embedded in an activity and the fragment's lifecycle is directly affected by the host activity's lifecycle. For example, when the activity is paused, so are all fragments in it, and when the activity is destroyed, so are all fragments. However, while an activity is running (it is in the resumedlifecycle state), you can manipulate each fragment independently, such as add or remove them. When you perform such a fragment transaction, you can also add it to a back stack that's managed by the activity—each back stack entry in the activity is a record of the fragment transaction that occurred. The back stack allows the user to reverse a fragment transaction (navigate backwards), by pressing the Back button.
When you add a fragment as a part of your activity layout, it lives in a
ViewGroup inside the activity's view hierarchy and the fragment defines its own view layout. You can insert a fragment into your activity layout by declaring the fragment in the activity's layout file, as a <fragment> element, or from your application code by adding it to an existing ViewGroup. However, a fragment is not required to be a part of the activity layout; you may also use a fragment without its own UI as an invisible worker for the activity.
This document describes how to build your application to use fragments, including how fragments can maintain their state when added to the activity's back stack, share events with the activity and other fragments in the activity, contribute to the activity's action bar, and more.
This is an example for how to use fragments with multiple activity without changing the coding. this is both for portrait layouts with respect to landscape. CLICK HERE for more about Fragment.
Portrait Orientations:
In Mainactivtiy contains menu fragment after clicking value in the listview the second activity containing the Body Fragment and text will be appear
Landscape Orientations:
In Mainactivity contains both fragments clicking button in the menufragment,text in bodyfragment will be change
Step: 1
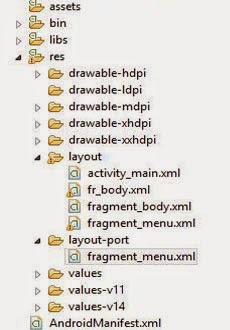
Create an Android Application Project and copy these codings into res folder
Step:2
create a folder named layout-port under res folder.
Portrait Layouts :
menu fragment.xml :
<?xml version="1.0" encoding="utf-8"?>
<RelativeLayout xmlns:android="http://schemas.android.com/apk/res/android"
 android:id="@+id/RelativeLayout1"
 android:layout_width="wrap_content"
 android:layout_height="wrap_content"
 android:orientation="vertical" >

 <fragment android:id="@+id/fragment_menu"
 android:layout_width="match_parent"
 android:layout_height="match_parent"
 class="com.androidtoppers.Fragment.Fragment_menu"/>

</RelativeLayout>
|
body fragment.xml :
<?xml version="1.0" encoding="utf-8"?>
<LinearLayout xmlns:android="http://schemas.android.com/apk/res/android"
 android:layout_width="match_parent"
 android:layout_height="match_parent"
 android:orientation="vertical" >

 <fragment
 android:id="@+id/bodyFragment"
 android:layout_width="match_parent"
 android:layout_height="match_parent"
 class="com.androidtoppers.Fragment.Fragment_body" />

</LinearLayout>
|
activtiy_main:xml
<?xml version="1.0" encoding="utf-8"?>
<RelativeLayout xmlns:android="http://schemas.android.com/apk/res/android"
 android:id="@+id/RelativeLayout1"
 android:layout_width="match_parent"
 android:layout_height="match_parent"
 android:orientation="vertical" >

 <ListView
 android:id="@+id/FragmentListView"
 android:layout_width="match_parent"
 android:layout_height="match_parent">

 </ListView>

</RelativeLayout>
|
Landscape Layouts: This is an xml for both menufragment and body fragment (Landscape)
Fragment_menu.xml:
<?xml version="1.0" encoding="utf-8"?>
<LinearLayout xmlns:android="http://schemas.android.com/apk/res/android"
 android:layout_width="fill_parent"
 android:layout_height="fill_parent"
 android:orientation="horizontal">

 <fragment
 android:id="@+id/fragment_menu"
 android:layout_width="wrap_content"
 android:layout_height="match_parent"
 android:layout_weight="1"
 class="com.androidtoppers.Fragment.Fragment_menu" />

 <fragment
 android:id="@+id/bodyFragment"
 android:layout_width="match_parent"
 android:layout_height="match_parent"
 android:layout_weight="1"
 class="com.androidtoppers.Fragment.Fragment_body" >
 </fragment>

</LinearLayout>
|
fr_body.xml:
<?xml version="1.0" encoding="utf-8"?>
<LinearLayout xmlns:android="http://schemas.android.com/apk/res/android"
android:layout_width="match_parent"
android:layout_height="match_parent"
android:orientation="vertical" >
<TextView
android:id="@+id/detailsText"
android:layout_width="wrap_content"
android:layout_height="match_parent"
android:layout_gravity="center_horizontal|center_vertical"
android:layout_marginTop="20dip"
android:text="...just.created..."
android:textAppearance="?android:attr/textAppearanceLarge"
android:textSize="30dip" />
</LinearLayout>
Step :3 Create an four java class files and copy these code into src folder MainActivity.java -->This is an Main class for both orientations BodyActivity.java-->This class only for portrait Fragment_menu.java-->This class for menu fragment Fragment_body.java-->This class for body fragment

Fragment_menu.class :


 create an MenuListner interface in fragment_menu we will implement this later
private onMenuListner frag_Listner;
public interface onMenuListner{
public void onMenu(String s);
}
create the listview and set the arrayadapter and pass the value in OnItemClickListner
ArrayAdapter<String> mAdapter=new ArrayAdapter<String>(getActivity(), android.R.layout.simple_list_item_1,android.R.id.text1, values);
mlv.setAdapter(mAdapter);
mlv.setOnItemClickListener(new OnItemClickListener() {
@Override
public void onItemClick(AdapterView<?> parent, View view,
int position, long id) {
// TODO Auto-generated method stub
SendTexttoActivtiy("Your position is \t"+position);
}
});
Intialise the onMenuListner interface
public void onAttach(Activity activity) {
// TODO Auto-generated method stub
super.onAttach(activity);
try{
frag_Listner=(onMenuListner)activity;
}
catch(ClassCastException e){
throw new ClassCastException("must implement onMenuListner"+activity.toString());
}
}
 Step :4

 Fragment_Body.java :
 create the method to settext for body fragment
public void setText(String s){
TextView text1= (TextView)getView().findViewById(R.id.detailsText);
text1.setText(s);
}
Step 5:

MainActivity.java:

 Implements the onMenuListner into the MainActivity.java
@Override
public void onMenu(String s) {
// TODO Auto-generated method stub
Fragment_body fragment=(Fragment_body) getSupportFragmentManager().findFragmentById(R.id.bodyFragment);
if(fragment!=null && fragment.isInLayout()){
fragment.setText(s);
}else{
Intent intent = new Intent(this,BodyActivity.class);
intent.putExtra("value",s);
startActivity(intent);
}
}
BodyActivity.java:

 check the orientation is landscape or not and pass the value into activty (body fragment in protrait)
if(getResources().getConfiguration().orientation==Configuration.ORIENTATION_LANDSCAPE)
{
finish();
return;
}else setContentView(R.layout.fragment_body);
Bundle extras=getIntent().getExtras();
if(extras!=null){
String s=extras.getString("value");
Fragment_body mFragment=(Fragment_body) getSupportFragmentManager().findFragmentById(R.id.bodyFragment);
if(mFragment!=null && mFragment.isInLayout()){
mFragment.setText(s);
}
}
}
Screenshots :


DOWNLOAD FULL SOURCE CODE
No comments:
Post a Comment